Beat sync for After Effects, by frequency band
Turn the kick, the bass or any frequency range of a song into keyframes and hit markers that any layer can follow, plus the BPM when the tempo is steady.
Free during beta on macOS and Windows. No card, no trial.
How do you sync animation to music in After Effects?
Turn the music into keyframes and let your layers follow them. In Flexile, beat sync is a tab on the panel’s Audio page. It analyses the sound of one layer or the whole comp mix, follows a frequency band such as the kick drum, and writes that band’s level as 0–100 % keyframes, one per frame, to a slider any property can follow.
- Select the layer with the song, voice-over or video, or use the whole comp mix.
- In the Flexile panel, open Audio → Beat.
- Pick a band: Auto, Kick, Bass, Snare, Hi-hat, Vocals or Full, or drag your own range on the spectrum.
- Check the preview. It shows the exact keyframes Flexile will write, the tempo and the number of hits.
- Click Create keyframes.
- Pick-whip any property to the slider, or paste the expression Flexile gives you.
Beat sync is part of Flexile, an all-in-one After Effects extension with easing, text animation, transitions, quick tools and subtitles in the same panel.
Animate to the beat. Caption every word.
The new Audio page listens to the song or voice-over in your comp. It turns the beat into keyframes anything can follow, and turns speech, or lyrics you paste in, into styled subtitle layers, word-timed for karaoke. It all runs on your computer.
Works fully over MCP
Ask your AI and it runs the analysis, writes the keyframes and creates the captions itself. For captions, click Download once in Audio > Subtitles first, because your AI can’t download speech models.
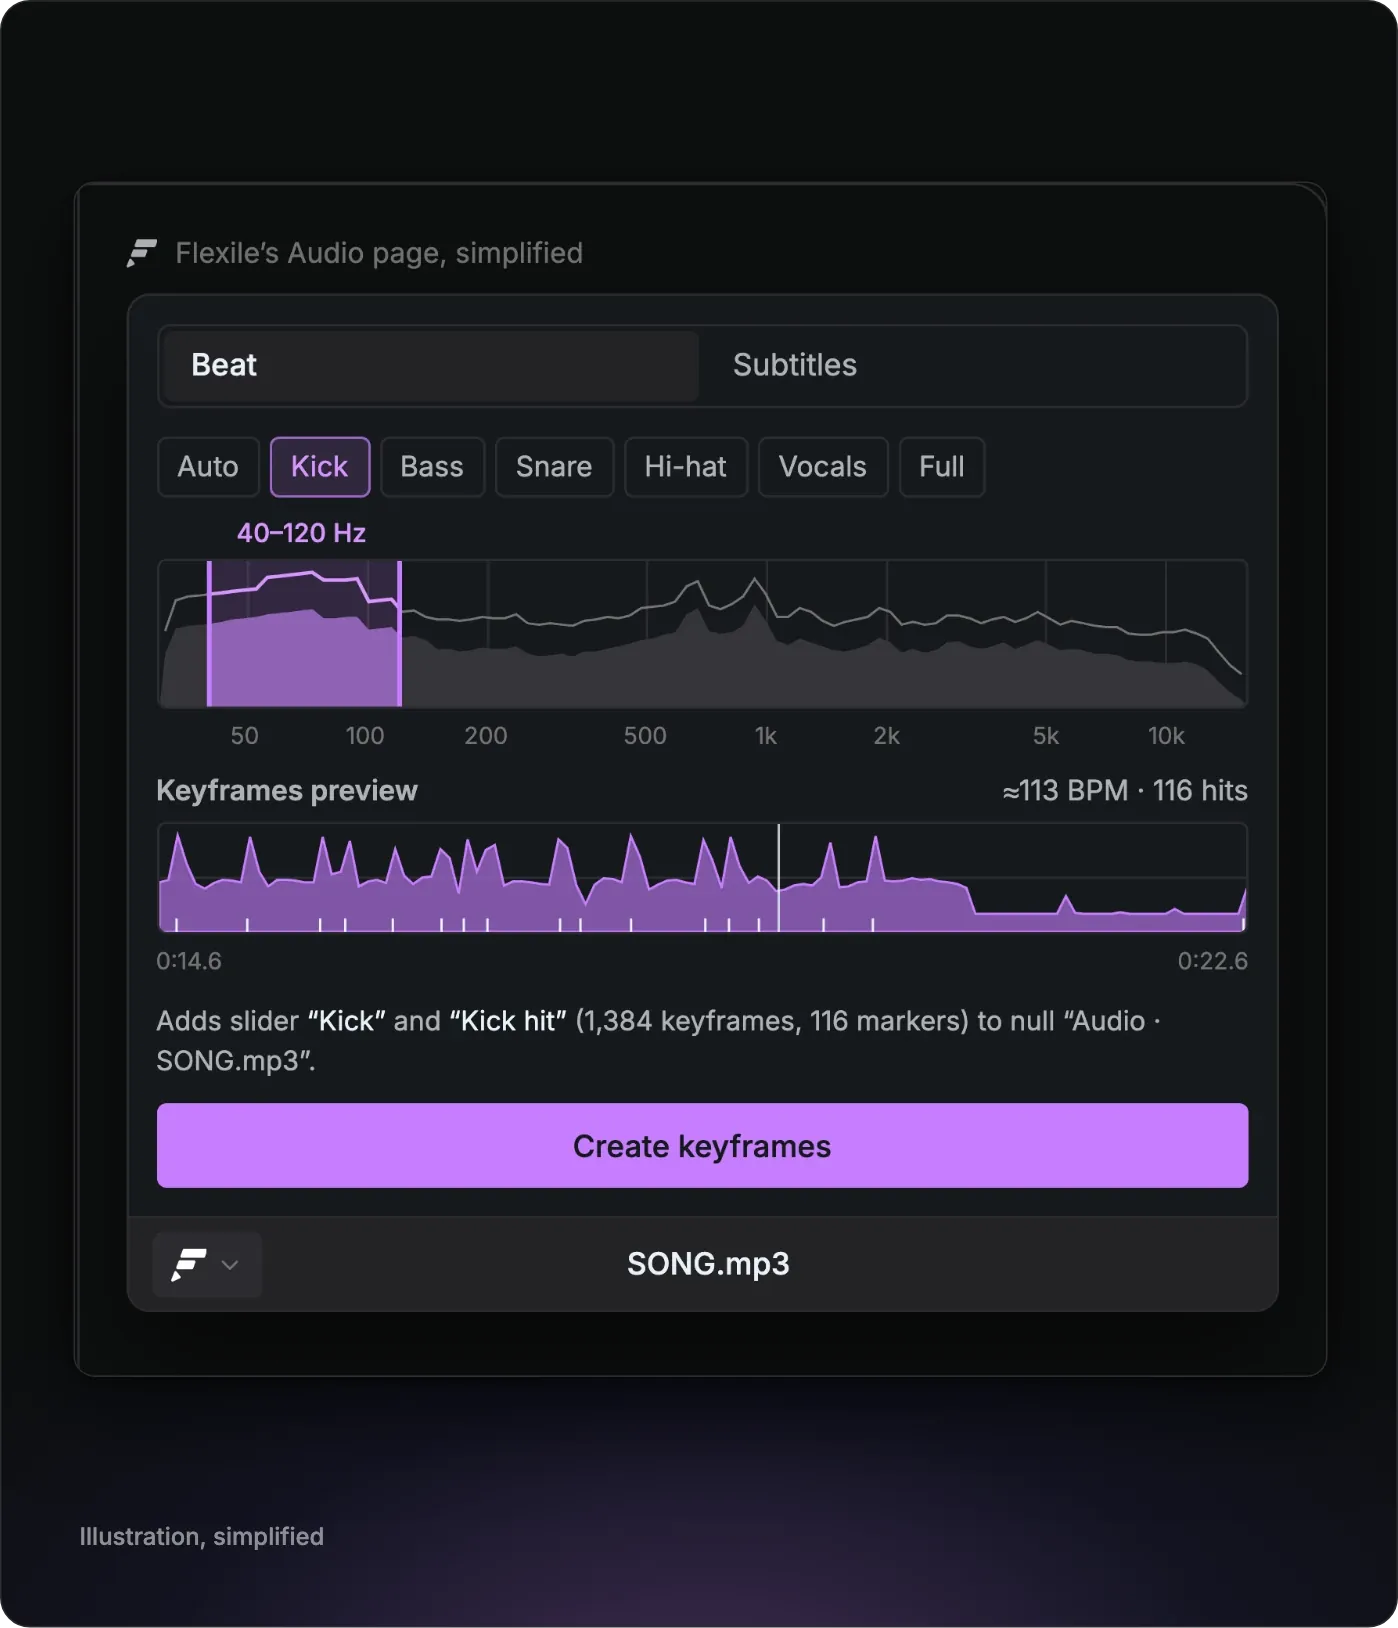
Flexile’s Audio page, simplified
Adds slider “Kick” and “Kick hit” (1,384 keyframes, 116 markers) to null “Audio · SONG.mp3”.
Simplified for this page. The real panel has many more options: bands you drag to any range, fine-tuning, 30+ languages and five speech models, caption layouts, styles copied from your own text layer, word colours and more.
h = thisComp.layer("Audio · SONG.mp3").effect("Kick hit")("Slider");
seedRandom(timeToFrames(time), true);
value + [random(-1, 1), random(-1, 1)] * h * 0.2“Make the logo shake on every kick of the song.”
Or in the panel: Audio → Beat → Create keyframes
Speech stays on your computer. Flexile uses a local Whisper model that downloads once, only when you click Download (32 MB to 574 MB). Subtitles need a Mac or a 64-bit Windows PC; beat keyframes work wherever Flexile runs.
Demo audio is a song and a voice-over made for Flexile. The spectrum, beats, keys and word times come from Flexile’s own analysis of these files.
Which bands can you sync to?
There are six presets, each a fixed frequency range. A band is a range, not a separated track, so other sounds in that range move the slider too.
- Kick: 40–120 Hz
- Bass: 60–250 Hz
- Snare: 1,500–4,000 Hz
- Hi-hat: 6,000–12,000 Hz
- Vocals: 300–3,000 Hz
- Full: 30–16,000 Hz
Auto
Auto looks for the most rhythmic low band in your clip. It tries seven ranges (30–60, 40–80, 50–100, 63–126, 80–160, 100–200 and 40–120 Hz) and scores each one by its tempo confidence multiplied by its share of the energy between 30 and 200 Hz. Its slider is named Beat.
Custom range
Drag the edges of the band on the spectrum to any range from 30 Hz to 16 kHz, at least a sixth of an octave wide. The slider takes the range as its name, for example 60 Hz–250 Hz.
What does Flexile write to your comp?
Flexile adds a null named Audio · <layer name> above the audio layer. For a whole mix, it uses the comp name. On the null you get:
- A slider named after the band, with one 0–100 % keyframe per frame from the layer’s in point to its out point, or over the whole comp for a mix.
- A marker on each hit and a
<band> hitslider that jumps to 100 and falls back, while Mark each hit is on. It is on by default. - Also while Mark each hit is on, a static BPM slider when the band has a steady tempo.
Each band gets its own slider on the same null. Run the same band again and Flexile replaces that slider’s keyframes.
In the demo song above, Flexile found 113.3 BPM and 116 kick hits. At 30 fps, the 46.12-second song gives a slider with 1,384 keyframes.
Above about 170 BPM the detector reports half the tempo, so a 174 BPM loop reads 87. Multiply by 2 in your expression if you need the full value.
Link a layer to the beat
This expression on a layer’s Scale reads the kick’s hit slider and grows the layer by up to 25 % on every kick:
s = thisComp.layer("Audio · SONG.mp3").effect("Kick hit")("Slider");
value * (1 + s / 400)
Replace Audio · SONG.mp3 with your null’s name and Kick hit with your band’s hit slider, for example Beat hit for Auto.
For shake, flash and other recipes, see our guide to audio reactive animation.
Fine-tune the detection before you write
Three controls sit under Fine-tune in the panel:
- Release (0 to 1,000 ms, default 120 ms): how fast the value falls after a peak. 0 follows the sound exactly.
- Floor: sound quieter than the floor reads 0 %. By default it is automatic: the band’s quietest 10 %, at most 24 dB under its loudest moment. Turn Automatic floor off to set it from -72 to -6 dB below the band’s loudest moment.
- Hit sensitivity (0 to 100 %, default 50 %): higher finds softer hits.
Reset returns all three to their defaults.
Nothing is written until you click. The panel states what it will add: the slider, the keyframe and marker counts, and the null. One undo step (Ctrl+Z or ⌘Z) removes it all.
Which audio files work?
The panel reads mp3, wav, flac, ogg, aac, m4a, AIFF, AIFC and the audio in mov files itself. Precomps and whole-comp mixes are mixed in the panel from their source files. Clips can be up to 20 minutes long.
Other formats and time-remapped layers need After Effects to render the audio first. The panel asks before it renders, because rendering clears the After Effects undo history.
Ask your AI to sync it
Flexile’s MCP server lets you ask your AI instead of clicking. A prompt such as “Make the logo pulse on every kick of the song” makes it analyse the audio, write the keyframes and link your layers to the sliders with expressions.
Other ways to sync to the beat in After Effects
Flexile is our product. The details below come from each vendor’s official page and Adobe’s help, checked on 25 September 2026.
The built-in keyframe assistant
Animation > Keyframe Assistant > Convert Audio To Keyframes creates an Audio Amplitude layer with three sliders: Left Channel, Right Channel and Both Channels. Adobe’s Convert Audio To Keyframes documentation says it measures the amplitude of all audio sources in the comp, within the work area, and mentions no frequency bands or beat detection. Use it when the loudness of the whole mix is what you want to follow. Flexile instead follows one frequency band of one layer or of the whole mix, and can add hit markers and a BPM slider. Our guide on how to convert audio to keyframes covers the steps and the usual workarounds.
BeatEdit
BeatEdit for After Effects by mamoworld detects the beats in a music track and uses them for beat markers, animated sliders, layer animation and repeated keyframes. It can also pick every fourth beat, random beats or subdivided beats. As of September 2026 it costs $149.99 one-time for a single-user licence, has a free trial and lists After Effects CC 2015.3 to 2026. Flexile writes a band’s level, markers and a hit slider for its hits, and the BPM when the tempo is steady. Its Beat tab has no option to keep every fourth beat, random beats or subdivisions. Our BeatEdit alternative post compares the two in more detail.
Trapcode Sound Keys
Trapcode Sound Keys from Maxon’s Red Giant lets you select parts of the audio spectrum and convert them to keyframes by amplitude or frequency range, for example to isolate a snare hit. As of September 2026 it is sold within the Red Giant and Maxon One subscriptions, with a 14-day free trial. Flexile also works by frequency range, from six presets, Auto or a range you drag, and is free during beta.
What you need
Adobe After Effects 2025 or newer
macOS or Windows. Beat keyframes run on any computer that runs Flexile, including ones that cannot run subtitles.
Flexile 0.17.0 or newer, the release of 24 September 2026 that added the Audio page
Audio clips up to 20 minutes
A Flexile account, free during beta: start for free
The extension, installed with the installation guide
Is my audio uploaded anywhere?
No. Flexile analyses the audio on your computer and never uploads it. The panel does need you signed in to your Flexile account, and it checks your licence online.
Can I use beat sync in commercial projects?
Yes. The free period has no commercial restriction.
How much does it cost?
Nothing during the beta. Every feature is free for everybody with an account, with no card and no trial. We will announce paid plans and their prices in advance on the pricing page and by email.
Still have questions?
Write to us at contact@flexile.io.
More in Flexile
The same panel also does this, free during beta.
- Easing
Ease every selected keyframe at once: 26 presets, Peak and Smart modes.
- Text animation
Animate text by character, word or line with 15 effects.
- Transitions
Preview a transition, double-click to insert it and retime it to the cut.
- Auto subtitles
Turn speech or lyrics into subtitle layers with a model on your computer.
- MCP server for AI apps
Let Claude, ChatGPT desktop or Cursor work in your After Effects project.
Free for everybody during beta
Every feature unlocked while Flexile is in beta. No card, no trial.
macOS and Windows